Welcome

This is a blog about the pursuits of Naturalist Alan Russo to incorporate all things Natural, especially Plants, into his daily life. Living close to Nature has always been a passion of mine and I try, with natures help, to live a Healthy lifestyle for myself and for the Earth.

Tuesday, March 20, 2012

Redbud Flower Pancakes!

  At 12:13AM the sun crossed the Equator on its way North towards the Tropic of Cancer, which signals the Vernal Equinox or Astronomical Spring. The weather, and the Earth/Sun relationship, don't always agree with each other. As for the Weather and the Plants, its been 'Spring' for a about a month already and the temperature has been in the 80s the past couple of days.
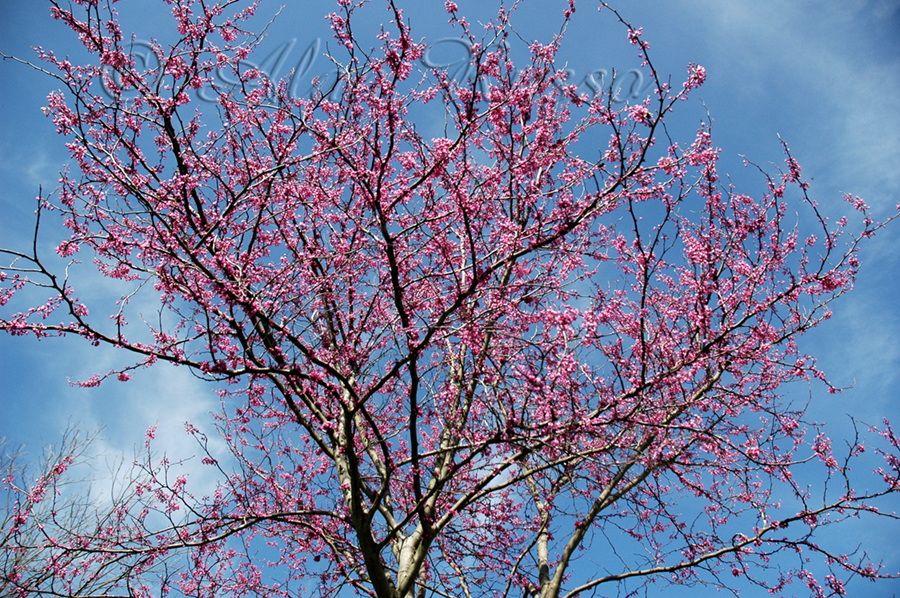
Redbud Tree In Bloom
 The Redbud Trees are in bloom already, and if you recall from last years post on Redbuds ( http://ethnobotanist128.blogspot.com/2011/03/redbuds-are-blooming.html ) this is a relatively new Wild Edible for me so I couldn't wait for them to bloom again so I can start my experimenting. I have been nibbling on the Flowers for the past couple of days and since the trees were in full bloom on the first day of Spring, I wanted to do something special with them so I decided to make Redbud Flower Pancakes!
 I collected a bowl full of Flowers early this morning for the pancakes. It was easy as the flowers are prolific and clumped together very tightly on the branches. For some close up photos of the Flowers check out last years post using the link above to get a good idea of what the Flowers look like.
Bowl-o-Flowers
I make my pancakes from scratch using Organic Rice Flour, freshly gathered Eggs, non-aluminum baking powder, soy or rice milk and a touch of Stevia. I don't know the exact recipe as I do it by "feel' as I make them. One thing is, I use extra egg because there is no gluten to hold the cakes together and they will fall apart when you go to flip them if you don't. Once the batter was made I added the Flowers and made the
cakes.

Batter with Flowers
Finished Product!

What a great way of bringing in the first Day of Spring, YUM!
Peace

Sunday, March 11, 2012

The Violets are here!


 Astronomically it may not be Spring yet but due to the mild Winter we have had, the plants around my house sure think it is.
 I love Sweet Violets. Not only are they beautiful but they are nutritious and medicinal at the same time. When I see the Violets flowering around my house I know the warm weather is just around the corner. I also know it's time to start sprucing up some rather boring winter salads. I had some Organic Lettuce in the fridge and decided to go foraging to turn it into a salad any wild plant enthusiast would be proud of. Using the Lettuce as a base I went outside and gathered a bunch of Chickweed, lots of Violet Flowers and leaves and some Dandelion Flowers for health and garnish. Not too extravagant but quite satisfying.
Peace

Tuesday, February 7, 2012

The best laid plans...........

  As an Environmental Educator, one of the programs I used to teach was Maple Sugaring. We had a Sugar Bush and a Sugar Shack where there was an evaporator and all the tools we needed to teach the process.            
 Where I lived I had three large Norway Maples in my yard and would tap them for the whole winter. I would usually get about 35 gal. of sap which equated to more than a gallon of syrup, they were very sweet trees!  
 Here in NC I have one Silver Maple on my property and the thought of taping my maple tree has occurred to me a few times but I had the notion, from all that I have read, that we are too far south. Than last year we had a very cold winter but by the time I thought about it it was too late.
 So, this year I thought about it when the weather got pretty cold there for a stretch. I went through the whole process and the sap actually flowed on the day I did it. I got very excited thinking I may actually get some syrup this year. Unfortunately it started getting warmer and warmer from that point on and the sap stopped running. Now the Tree's buds are swollen and it is in Spring Mode so the chance of getting any more sap is slim to none.
 Looks like this Ethnobotanical Pursuit is not going to happen as planned, yet, it was a pursuit non the less and it felt good going through the motions again. What follows is a description of the steps for tapping a tree, I hope you find it interesting even though I was not able to see it through to the end product.


 The first thing you need to do is make or gather a Spile. A Spile is a hollow tube. My favorite Spiles are Bamboo and my next favorite is the hollow stems (once you take out the pith)of Sumac. I decide to make one for the project this time. The Spile is what allows the sap to drip away from the tree so it can be gathered easily.
The O.D. of the Splie should be slightly larger than the hole you will be drilling into the tree and tapered at one end.

 Next you need to find a Maple or other suitable tree to Tap.The tree need to be at least a foot in diameter and should be in the sun if at all possible.
 This might be a good time to explain the whole Tree/Sap thing. Sap is mostly water and the Tree uses it to transport water and nourishment in the form of vitamins minerals and sugars from the roots/leaves to the rest of the tree. Remember Xylem and Phloem? Since the sap is mostly water, in the cold winter, the tree sends the sap down to the roots for storage, because if it stayed in the tree and froze, it would crack the tree due to the waters expansion. So, on a very cold night the sap heads down to the roots and if the day warms to around 45deg. the sap goes back up the tree. This is referred to as "the sap is Running". Sap can only be collected if it is Running, this is why all Maple sugaring is done in the north, and even there, depending on the weather, they may only get two or three good sap Runs a year! Just one of the reasons Maple Sugar is so expensive. So the ideal time to collect Sap is when we get freezing nights and the days warm to above 45deg.
 Back to the process. Because of the above explanation you should Tap or drill your hole on the south side of the tree because it warms first and will start to flow sooner. I have Tapped large maple trees with three taps going around the tree and the Tap on the south side always starts dripping first. Some days when the Temperature is teetering on being warm enough, only the south facing Taps will produce. Also if you can Tap the tree under a large branch you will get more Sap as the tree has to send more to that part.
 Drill your hole at least three feet of the ground and at an downward facing angle. This angle is important so the Spile never clogs with frozen sap. the hole only need to be about 1.5 inches deep.


Once the hole is drilled. Tap the Spile in, tapered part first, with a rock or hammer till it seats nice and tight, this will prevent sap from being wasted and just running down the tree.

If you do this on the right day the sap will start flowing immediately!


Next you need to find a container to collect the sap. If you use a nail to hang your container, please don't use galvanized, it is toxic to you and the tree. You notice I am using glass, if you do the same, you need to empty the sap every night or your jar will crack if it freezes. Learn from my mistakes, I have lost Sap his way!
Once you collect enough sap you can start to boil it down. Depending on how sweet your tree is it could take up to 50gal. of sap to make 1gal. of Syrup! Keep in mind that all that water has to go somewhere when you boil it off, imagine what 40 gal. of steam will do to your wall paper!
 Once you get close, and the Sap starts to thicken, watch it very closely as you can burn it quite easily. A mistake you don't want to make after all the time, effort and energy to get this far. Your Sap will be Syrup when it reaches 219 deg.
 Unfortunately, we have to wait till next winter to try this again, but start to scout out the trees you will use and get the materials together, and good luck!
 As you can see, even the best laid Ethnobotanical Pursuits of mice and men often go astray!
Peace
Wednesday, February 1, 2012

Whats goin on?

  It has been a relatively mild winter, at least compared to last year, for this area of NC. It is Feb. 1st and Spring has sprung already. We have had Dandelions, Henbit, Speedwell, Chickweed and Sweet Violets all Winter long in small amounts. Now, Daffodils have been flowering on south facing hills for almost two weeks already and I saw the first flowers on my Forsythia today.
 So whats goin on? Maybe this is normal once in a while in NC, and maybe I haven''t lived here long enough to have seen the cycle unfold. Or maybe it's climate change, who knows. But daffodils in January, now thats just crazy! Whatever the reason, I'm going to take advantage of it and make a wild salad today. I never seem to eat enough fresh greens in the winter, I am so used to eating fresh Organic greens from my garden the rest of the year, sometimes I'm too stubborn to buy them at the store for stupid prices. I rely on much of what I had frozen for the Winter.
Peace
PS. It's Feb. 2nd and I heard Spring Peepers singing this morning!

Thursday, December 22, 2011

Welcome to Winter

 Today, December 22nd, is the shortest day of the year, with the Sun being at it's lowest point in the sky for we here in NC, USA. The north Polar Axis of the Earth is tilted directly away from the Sun and from this point on will begin to swing around and start pointing more and more back towards the Sun. Because of this shift, from our perspective here on Earth, the Sun begins it's apparent trip Northward towards the Equator which makes our days in the Northern Hemisphere begin to get longer.
 Just a few Nature observations. Our temperatures this Fall have been all over the map. Just the other day it was 19 deg. when I got up to go to work. But today, ironically, it was 70 deg. on the first day of Winter! There are Dandelion Flowers blooming all over my property, there are Sweet Violets in bloom, Field Garlic leaves in abundance and I have patches of Chickweed, green, succulent and in bloom in several places. Henbit is taking over my recently tilled gardens and the  Basal Rosettes of Thistle leaves are as large as I would expect them to be in the early Spring. Yum! As soon as the rain stops I will go and pick a nice salad of "Spring" Greens to celebrate Winter!
Peace

Friday, December 9, 2011

Acorn Muffins!

  Fall is the time of year where most Trees produce seeds, it just so happens (by chance?), it is also the perfect time for those living close to nature to collect their stores of high protein and high fat foods to help them survive the long cold Winter. Everything from Squirrels to Woodchucks to Mice and Rats are scurrying around to store enough food. There once was a time when primitive Humans in North America, who lived by the cycles of Nature, had to do the same.
  One of the staple foods to many a primitive Human, especially in Eastern N.America, was the Acorn. The Acorn is the perfect food to store for winter survival. It is high in Protein, Fat and minerals, and comes in its own little package to keep it fresh all winter long till it is needed. It is readily available, and in many forests, there are more than any one family could ever collect and use.
  Acorns come from Oak trees, and the Acorns they produce are as varied as the trees that produce them. They come in all shapes and sizes and are colored in many shades of browns and reddish browns. Two major types of Oaks are the White Oaks and the Red Oaks. Oak trees, in general, are known for their high Tannic Acid content, one of the things that make Oak Trees Medicinal due to it's astringent nature, and the Acorns take up that Tannic Acid. Unfortunately Tannic Acid is is extremely bitter also, which make most Acorns too bitter to eat without processing. White Oaks tend to have less Tannic Acid in their Acorns and I have found some White Oaks in my time that I was able to eat the Acorns right off the tree.
 Luckily, Tannic Acid is water soluble, so it is possible, with a little work, to leach the Tannic Acid from the Acorns to make them palatable. In primitive times, if you were lucky enough to live by a river, you could put the shelled Acorns in a basket and throw it in the river, and as the water ran over the Acorns it would leach out the Tannic Acid. At this point you could use them as they were or dry them for storage to be used later.
  What made me start thinking about all this Acorn stuff was; I had gone over a friends house to get some fire wood that he had just cut down and as I pulled into his driveway the whole driveway was filled with Acorns from a huge White Oak he had in front of his house. I don't have any Oak Trees on my property so I asked him if he wouldn't mind if I gathered some. If I wanted too, I have no doubt I could have easily collected over 200 pounds from this one tree! I didn't of course, I only collected a small bucketful to play around with. I have done this before, though it's been a long time, and I remember how labor intensive it could be.
  What follows is my non-primitive way of processing Acorns.

Whole Acorn right from the ground
 When I got home I tried to crack some of the Acorns but found it very hard to get the shell off, so I gave up and put the Acorns in the garage and promptly forgot about them for a couple of weeks. When I finally got around to trying them again the nut had dried inside and pulled away from the shell which made it alot easier to take the seed out.
Shelled Acorns 
 The next thing I did was to winnow the seeds to separate the debris from the usable parts.
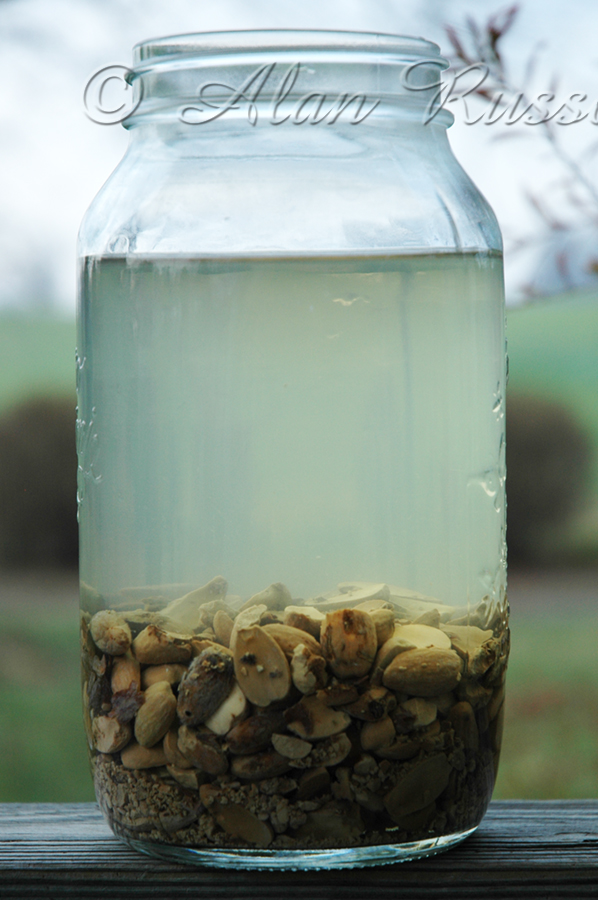
The next step is to leach the Tannic Acid from the Acorns. I did this by placing them in a large Mason Jar and filling it with water.
The brown Tannic Acid Leaching into the water
 There are a couple of ways to do this, one is to have a place where you can keep water slowly running in the jar and continuously overflowing till it stops turning brown. The other is to keep changing the water over and over again for a couple of days till it stops turning brown. This is what I did and it took about three days and maybe twelve or fifteen changes to get to this:
Clear enough!
 Next, I put the Acorns on top of my wood stove to slowly dry. Once dry, I ground them in a blender (real primitive!) into a flour. I put the flour into a small Mason Jar for storage.
Acorn Flour
Today I decide to make some muffins with the flour. If you want the muffins to come out light and fluffy, you have to add some other kind of flour to the mix or the muffins will come out hard. I used some Organic Spelt Flour for mine and just followed a basic muffin recipe.
Acorn Muffins!
The Acorn flour makes the muffins come out very dark and earthy looking, and the Acorns have a unique taste that doesn't compare to anything else I have ever eaten. The taste brought back memories of the first couple of times I tried this years ago. They were really good!
Peace

Monday, November 7, 2011

Mums The Word

Chrysanthemum

  Fall, in my part of NC is so much different, Botanically and Meteorologicaly speaking, than LI where I am from. Here in NC, the weather fluctuates so much in the Fall, the plants don't seem to know what to do. A couple of days ago we had frost and tomorrow is supposed to be 70! Many of the Wild Edible plants that die off in the hot Summer and are normally Spring plants make a come back this time of year. I am not used to this behavior and it still surprises me to see many plants, I know of as Spring plants, bloom again in the fall. There are Dandelions, Sweet Violets, Henbit, Chickweed and Field Garlic all flowering or growing thick and green, as they would in the Springtime. To me it's an unexpected treat, especially since the frost killed most everything in my garden, it is nice that Mother Natures Garden is still producing.
  Yet on the other hand, many plants are doing just what I'd expect this time of year. One plant I can always count on to bring color to the Fall is Chrysanthemum. Chrysanthemums, like Pumpkins and Gourds, all seem to fit together representing  harvest time and the Fall.


Autumn Salad
  Chrysanthemum flowers are Edible and I sometimes use the flower pedals as a garnish on salads or they can be used as an additive to muffins or pancakes. It's not a Edible I use very often but it's fun to know they are there if you need something fun to add to your meal. The pedals of some plants can be bitter and not taste very good so you will have to experiment to see if they are good or not. Above is a salad I made for dinner tonight and it contains Chickweed, Violet Flowers, Dandelion Flower, and some Chrysanthemum Flower pedals. Except for the Mums, everything else is an unexpected treat I am not used to seeing this time of year.
Peace 

Saturday, October 22, 2011

Fire by Friction

  Though I have focused mostly on Wild Edible and Medicinal Plants of my area in this Blog, my interests in Ethnobotany are many and varied. Though Edible and Medicinal Plants and Herbology have remained my passion, I still dabble in other aspects of Ethnobotany from time to time. If you have been following this Blog you will remember my forays into Natural Dying, making Cordage etc. I also have a strong interest how cultures from around the globe use plants in their everyday lives.
  Ethnobotany is the study of how cultures (Ethno) use plants (Botany). Historically, and in modern times, humans have used plants in every conceivable way to help them survive. I have studied Primitive Technology for may years and have taken may classes learning basic Primitive Technology. I teach basic Survival workshops for the public and have designed and taught many Survival classes for young students while I was an Environmental Educator.
  Making fire has been an important part of human evolution. Today we take this hard earned art for granted, we go to the store and find hundreds of ways to easily start fires. I remember when I used to do alot of backpacking, back then, "getting back to Nature" would always involve having the latest fire starting device and technologically advanced cook stove we could find, because one thing is for sure, you don't want to be without fire in the Wilderness.
  Fire by friction (the old adage, rubbing two sticks together) is the oldest and most Primitive way of making fire. What started me thinking about writing about using plants to make fire was the fact that it has been cool here and the Yucca plants I need for the project are at the perfect stage to do this. What follows is a very BASIC explanation on how to make fire using Yucca Flower Stalks.

Dried Yucca Flower Stalks

  The dried flower stalks are the part you need to make the fire making tools. By this time of year the stalks have been drying in the hot sun for over a month, so they are good and dry. 
                                        
 Above are all the parts of the apparatus, known as the Bow Drill, you will need to be successful. The parts you will make from the Yucca Stalks are the Fire Board and Spindle. The Spindle is just a straight part of the Stalk with points carved into both ends.


The Fire Board  is made from the thickest part of the stalk and is flattened on two sides opposite each other so it will lay flat on the ground and you have a larger flat surface to work on. A notch is made in the fire board where the spindle is going to rub to collect the hot coal you will produce. Here is a closeup of the fire board with the notch and the depression that will except the spindle.

The Spindle gets wrapped in the string of the Bow, so as you move the Bow back and forth, the Spindle spins at high speed. The bottom of the Spindle is on the Fire Board, which is laying on top of the piece of Birch Bark, creating friction between the Spindle and the Fire Board. The top of the Spindle is being held in place with the Hand Hold. You must lubricate the Hand Hold to prevent friction from happening where your hand is. Also, note the position of my wrist, it is leaning against my shin for support so the Spindle doesn't wobble all over the place. Placing enough pressure on the Spindle with the Hand Hold, start cranking back and forth with the Bow to start to get the Spindle to spin as fast as possible. Notice in the photo the amount of smoke you will make just by rubbing two sticks together! When you get to the point that your arm is about to fall off and you are making a prolific amount of smoke, stop cranking and carefully remove the Spindle from the Fire Board. Hopefully, if you did it long enough, all the dust created from the friction will have gathered into the Notch of the Fire Board and the friction itself will have heated it up enough to start it glowing like a red hot coal.

 Once you have a glowing coal, pick up the Birch bark and transfer the Coal into the center of the birds nest shaped Tinder Bundle. This bundle is made from Cedar bark shavings and Milkweed seed Down (using more common plants!).


  Once the Coal is in the Tinder Bundle, gently blow on the Coal to get it to glow super hot and the Tinder Bundle will start to smoke profusely. 


  Just a few more breaths and the bundle should burst into flame! I didn't mention this before but you should already have your Tepee fire set up and ready to accept the flame.
  Don't be discouraged if you don't get a fire the first few times, you'd be surprised how much practice it takes to be successful. Once you where through the fire board in one spot just start another hole and notch next to it. Good Luck and stay warm!
Peace

Friday, October 14, 2011

Jerusalem Artichokes / Sunchokes

Chokes on Plant
Ready to eat !

  Autumn is a time for harvest. It is a good time to dig roots a tubers as the plants are beginning to store their  nutrition in their roots for surviving a long winter and to have a nutritional boost in the Spring to get them started.
  When I teach Wild Edible and Medicinal Plant workshops, one of the important rules of collecting that I teach my students is not to rely on common names for a plants identification. Jerusalem Artichoke is a perfect example of a common name that can mess you up when trying to figure out a plant. This plant has nothing to do with Jerusalem and is not related to Artichokes in any way! Rather than type out a long explanation I would like to point you to a site I found that does a great job in explaining the whole deal: http://www.vegparadise.com/highestperch26.html . Just keep in mind the whole thing about common names and you will have a safer collecting experience.
  I brought my Chokes with me when I moved to NC. It doesn't take many as the reproduce like crazy. If you plant them you better have a place set aside that you can dedicate to the chokes for the rest of your life! They are  extremely prolific. Even if you leave a small piece in the ground when digging them up you will have more plants than you know what to do with in a couple of years. On the bright side, you will never go hungry again!
  Jerusalem Artichokes are actually sunflowers. They bloom in the early Autumn, rather than in the summer like most sunflowers. They can grow quite tall, 7 feet or more is common, and the yellow flowers are small compared to the size of the plant. The flowers don't last very long and you should wait till the flowers and the plants die back before you collect the Tubers for optimal nutrition. Speaking of Nutrition, here is a site that shows the nutritional value of Jerusalem Artichokes:  http://nutritiondata.self.com/facts/vegetables-and-vegetable-products/2456/2   Besides all this, the polysaccharides  in Jerusalem Artichokes are in the form of inulin and not starch which means they has a very low glycemic index and are excellent for diabetics when eaten raw.
  Jerusalem Artichokes are really good! They have a mild flavor, are very crunchy (like water chestnuts) and can be used lots of ways in many recipes. I like them best raw, but they can be boiled, sauteed, juiced or baked. I've made them Scalloped on many occasion and they were delicious. The biggest problem is to know what to do with all those Chokes!  
Peace

Monday, September 5, 2011

Sumac Aide

Drupes
 Though it is still hot in my part of NC, signs that Fall is on the way are everywhere. My Sumac Plant has grown huge this year and has a prolific amount of Berries. The berries are at the perfect stage to make Sumac Aide.
Berries with white Malic Acid covering.
  The berries of all the red berried Sumacs (poison Sumac has white berries) can be used to make a delicious tart drink that resembles Lemon aide. I love sour stuff so I look forward to the berries every year. What you are after are the berries with a shiny white coating of Malic acid. If you are not sure your Berries have Malic Acid on them take a couple in your mouth and if your mouth shrivels and puckers, you know you have enough! Malic Acid is a naturally occurring chemical in many fruits and vegetables, it is the chemical that makes Apples tart, with Apples being one of the higher sources of Malic Acid in fruits. Malic Acid has many health benefits, one of which is to increase energy in those with Chronic Fatigue. Who couldn't use more Energy! Search the web for the many health benefits of Malic Acid.
  Different Sumacs have varying amounts of Malic Acid on their berries, as do the different Species, amounts also depends on the Environment in which they grow. My Sumac is a Winged Sumac and produces alot of Malic Acid, I have also had good results with Staghorn Sumac and Smooth Sumac. Try to get the berries before a strong rain as Malic Acid is water soluble and much can wash off in the rain.

Soaking the berries in Water
 Collect the berries, taking as little of the stems as possible. Don't forget to lick your fingers when you are done picking for a super tart treat! Take as many berries as you care to and soak them in enough water to cover the berries.  Use cool or warm water for this. Sumac has high amounts of Tannic acid in the stems leaves and roots with the roots having the highest amounts. If you use hot water, you will start to extract this Tannic Acid and your drink will be bitter. Tannic acid is one of the things that make Sumac a Medicinal Plant. Tannic acid is astringent and antiseptic and makes a great skin wash for oozing sores like Poison Ivy.

Finished drink!
While the berries are soaking, agitate the berries frequently to hasten the removal of the Malic Acid. I do this by squishing the berries with my hands or use a potato masher or what ever suites you. Taste the liquid  to see if it is tart enough for you. When it is to your liking, strain the liquid with a fine tea strainer into bottles and refrigerate. At this point, if you feel you got alot of insects or the berries were not as clean as you would have liked them to be, you can boil the liquid to pasteurize it. If you do, you might like to try the drink hot like a tea, it is quite good this way. Add some Honey if you must, but I like it just the way it is.
  You will notice in the photo above the liquid is pink in color. This will vary depending on the species you use. Staghorn Sumac makes the brightest red drink due to its "fuzzy" berries. Because of this, be sure to strain it well with a super fine strainer to get the "hairs" out. Enjoy this great natural drink from Mother Nature!
Peace

PS  If you really like this drink and want to have it even after the plant has died back for the winter, you can pick a bunch of berries at their peak and dry them and they should last you all winter.